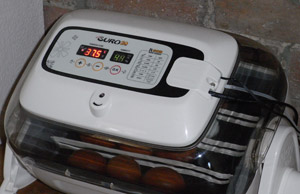
Hatching eggs can be a very rewarding experience and many beginners are buying incubators since they have become far more affordable over the last few years. The main manufacturers for the small scale hobby market are R-COM and Brinsea Incubators. Both produce an excellent range that can accommodate 20 to 25 chicken eggs, perfect for the beginner to hatch their own eggs!
Before you start
Before you incubate and hatch chicks, you should remember that you will end up with a ratio of half male and half female chicks. Unless you are hatching an autosexing breed (where markings or colour of the chicks are different colours) or have crossed two birds that give a sex-linked chick (again, different down colour or markings) then you will need to think ahead to when the young growers can be sexed around 8 weeks of age and consider what you will do with the excess of male birds. Sadly, they are very hard to re-home, everyone has the same problem: too many boys.
Choice of incubator
There are essentially two types of incubator –still air and forced air. The big difference between the two is the forced air uses a fan which circulates the air inside. When you measure the temperature, it should be the same throughout. The still air incubator has a temperature gradient inside so the hotter air rises to the top and there can be several degrees difference between top and bottom. For the average beginner wanting to increase the size of their flock, a forced air incubator is in my opinion the best choice. If you can afford a model that has automatic humidity control then you should have far more success than setting and maintaining the humidity control on a manual unit.
Incubating Chickens Eggs
Chickens eggs have a 21 day incubation period (isn’t that amazing? Egg to chick in just 3 weeks!) and require a constant temperature of 37.5°C. Eggs will start to produce their own heat in the latter stages of development but the incubator thermostat takes care of this, keeping the temperature the same throughout the incubation period. Humidity should ideally be between 45 and 50%. Eggs need turning regularly by 180 degrees and you will need to do this yourself if the incubator doesn’t have an automatic turning mechanism. Expect 50% to 75% of your eggs to hatch, not all eggs will be fertile.
Hatching Eggs
Eggs need to be fertile so a cockerel needs to be running with the hens for a few weeks before eggs are taken for hatching. If you have a cockerel, you can collect your own hatching eggs from your chickens. Try to pick good looking ‘egg shaped’ eggs, this will help the chicks form and hatch correctly as mother nature intended. Keep nest boxes clean and don’t set any soiled eggs. If you don’t have a cockerel or would like a different breed, there are many hatching eggs for sale online on sites such as eBay but keep in mind that just about anyone and everyone sells eggs so birds vary in quality between sellers. Hatching eggs travelling through the postal system can be damaged internally and either not develop or die before they hatch. These are often called dead in shell.
Incubation tips:
- Before you put your eggs into any incubator, make sure it has been sterilised with an incubation disinfectant (or as a minimum warm soap and water if you don’t have this). This will kill bacteria that multiply rapidly in the warm temperature of the incubator.
- Plug in your incubator and make sure the temperature is steady at 37.5°C. Always leave it to run overnight to settle before putting eggs in.
- Keep water reservoirs topped up so that adequate humidity can be maintained at all times.
- Candle eggs before putting them into the incubator. Cracked or damaged eggs do not hatch and should be removed after candling (see below for more information on candling).
Candling Eggs

Candling an egg in the dark using a special candling torch. Blood vessels and the embryo can be clearly seen after a week.
Fertility of eggs cannot be determined before incubating them. It is easiest to see development of the embryo after a week. The most critical period of incubation is the first week so if you do decide to candle your eggs before a week then be very careful with them and do not overheat them. Eggs with blood rings, cloudy eggs or clear eggs (infertile) should be removed when detected. The photo to the right shows an egg that was candled after 8 days. If you can’t see much, do this in the dark. It may also help to tip the egg gently from side to side so you can see the inside of the egg moving and see what are patches on the egg shell and what is inside. The developing spider like veins and a small dark embryo can be seen. If you look carefully and have a bit of luck with the positioning of the embryo, you can often see a small heart beating away. I usually candle after 7 days and again at around 14 days. There is more information on a separate page about candling eggs.
The Air Sack
An Air Sack is formed at the broad end of the egg shortly after an egg is laid. There is a membrane between this and where the chick is developing. When candling periodically through the incubation period, this is the best method of judging normal development and you will see this increase in size up until the point that the chick breaks through into this air sack.
The Hatch
- A chick will usually ‘pip’ the shell a few hours after breaking into the air sack so she can breathe but a full hatch can take 12 or more hours from this point so be patient.
- If humidity has been set too high during the incubation period, the chick may pip the shell underneath the shell and drown in the fluids before he can get his beak out of the shell.
- If the humidity has been too low, the air sack will be too large and the chick will be under-developed and may become stuck to the shell, too weak to break free.
If a chick has pipped but does not make any progress, wait 12 hours, then consider breaking the top part of the shell away (but no more…) Some say do not help weak chicks as you are breeding weakness into your flock but there are many reasons why eggs don’t hatch. If it is a humidity problem like this or the line is particularly in-bred (often found with exhibition strains) then a little help can usually be given without detrimental effect.
The film above is speeded up and shows the final moments of a Copper Black Marans egg hatching in an RCOM King Suro incubator. As you can see with the King Suro, there is a good viewing window to see what is going on! It is my favourite incubator and is incredibly well priced.
And finally…
- Do not remove hatched chicks until they are fully dried out. Chicks do not need to eat for 24 hours. This is why they can be shipped around commercially as ‘day old chicks’.
Good luck with your hatch!
Do you have any tips on hatching eggs? Please leave me a comment below.


Hi we have a chicken sitting on eggs, my question is I can hear a cheeping noise, does this mean they are about to hatch. As it was louder on Saturday and much quieter today. There is also a smell of rotten eggs, do I just leave them in the nest until we are lucky enough to have chicks, or how would We be able to tell them apart.
Any help would be appreciated.
Yes, chicks will cheap inside the eggs sometimes and start to communicate with the mother hen when hatched under a broody.
The rotten smell is a bad egg or eggs -they can explode in the incubator, contaminating everything with bacteria so you should normally remove eggs that aren’t fertile when candling, you may still be able to do this later on before the hatch and you can often see ouzing of fluid from bad eggs.
Candling before hatching doesn’t show much but you can see black where the chick is and light where the air sac is. If you twist the egg back and forth gently, you may be able to see the contents of a bad egg swishing around.
hiya what does it mean when my chicken eggs start to shake at day 21 ?
It means the chick is moving around which they will do as they try to break free of their shell.
Black Copper Marans’ seem to have a hard time breaking through their shells which are very thick. We had to rescue one of ours who was stuck because he had managed to twist his leg behind him. A gentle bath in warm water solved the problem and he is now a fine healthy bird.
We take our chicks out of the incubator after they have dried a little and put them into a nice warm brooder. They seem to get stressed if left too long in the incubator.
As for not needing to eat for twenty four hours all our chicks have been hungry and crying soon after hatching and have happily tucked in to chick crumb once they were shown what to do and I think you forgot to mention that they need to drink. Gently dip their beaks in to water they soon get the idea.
Usually the shell only sticks to them if you have the humidity incorrect. Or if you open the incubator too often (open only once a day to remove DRIED chicks). If you open the incubator to often you remove the humidity causing the chick to become stuck to the membrane. This could also be why he was having a tough time. Chicks can actually live in the incubator for up to 3 days without food or water and it will do them absolutely no harm. They do not need to be shown how to drink. Chickens are intelligent birds and as long as there is some available they will find it.
Hi there I need help urgently, I used to get a average of 70 percent hatch rate now I don’t even get 1 percent hatch rate and I buy eggs from different supplies all spec on my machine is the same
Well, there is something wrong somewhere! You need to check the eggs you buy are OK, at what point do they die – are the chicks developing? Are they dead mid-term or early into incubation?
Check the temperature and humidity on your incubator are calibrated. For example whilst it may read the correct temperature, it may be too hot which would kill the embryos fairly early on.
My daughter’s teacher would like to have some of our chicken eggs to hatch in her classroom. I’m new at having chickens and not sure about transporting them. Should they be kept at certain temperature until delivered? Anything else I should know?
If you collect the eggs, store them in egg boxes, pointed end down in a cool place (I use a garage but a utility room or similar would do). Prop the box up at one end so the eggs are tipped at 45 degrees. Alternate the side that’s propped up morning and night so that the eggs are tipped through 90 degrees in total. This stops the yolk from settling and sticking to the inside of the shell. You can save eggs for about a week or so before taking them in to school.